

Step 1: Put Down Your Phone
If you’re reading this on your phone or tablet, bookmark it and come back when you’re sitting in front of your computer. What we’re about to walk through requires you to actually be at your computer, not squinting at a 6-inch screen trying to locate a file with your thumbs.
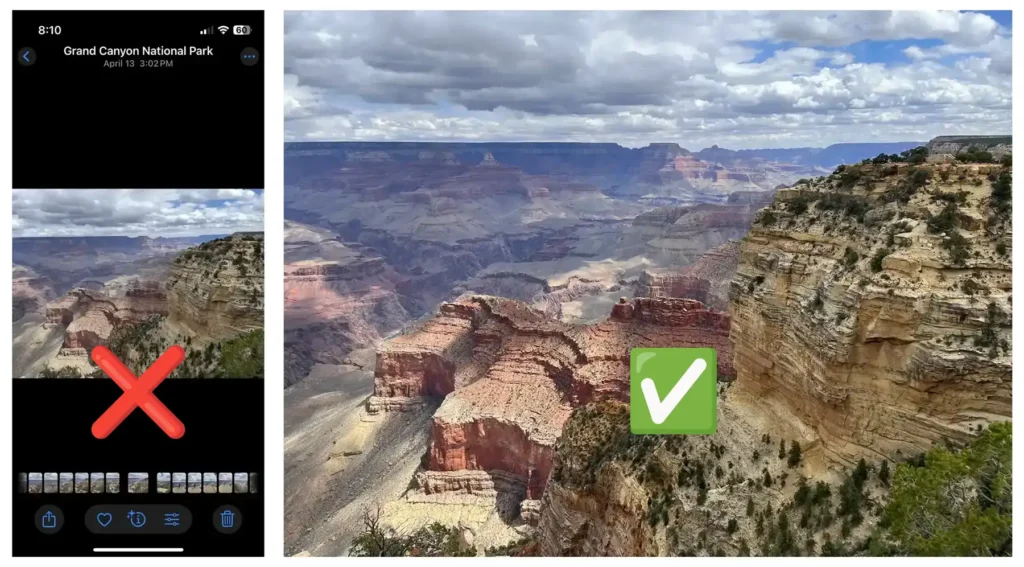
Take a look at the two images below. The left shows a screenshot of the Photos roll in an iPhone. We can’t print this. What we need is the actual photo file, shown on the right.
File management is a basic computer skill that everyone should learn, and these skills transfer to many life opportunities far beyond just sending in a file to print. Knowing how to navigate your file system, organize folders, and send files correctly is the kind of practical literacy that makes you more confident and capable in almost any modern setting.
Step 2: Understand Where Your Files Actually Live
Your computer has a file system. Think of it as a giant filing cabinet. Every document, photo, and design file you’ve ever saved is sitting somewhere in that cabinet: organized into folders, inside other folders, on a specific drive. The challenge is knowing where to look.
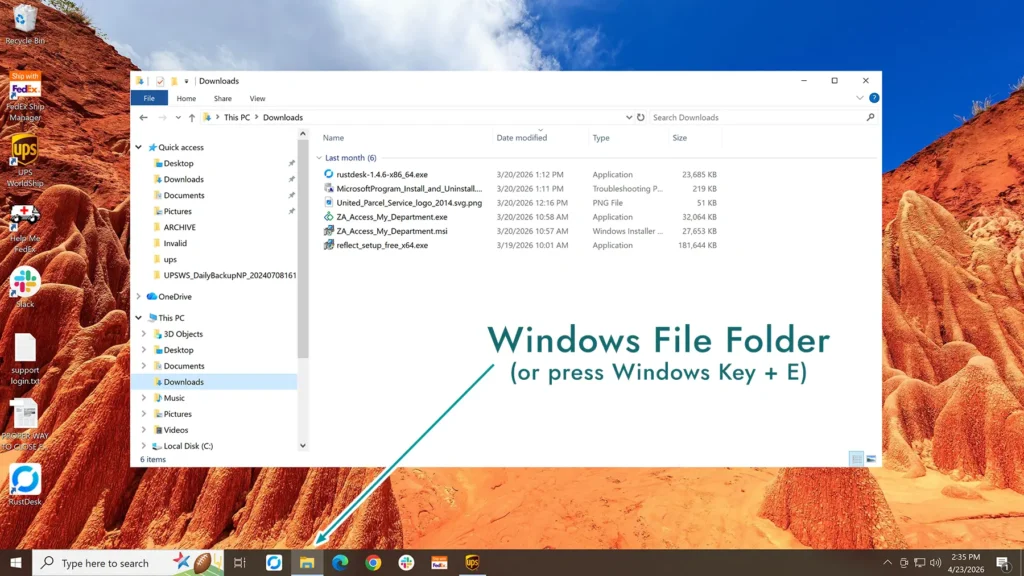
On Windows
Open File Explorer (the folder icon in your taskbar, or press the Windows key + E). You’ll see a left-hand panel with locations like:
- Desktop — files you’ve dragged to the screen for quick access
- Documents — the default save location for most programs
- Downloads — anything you’ve downloaded from the internet or received via email
- Pictures — where many photo apps save images automatically
- This PC / OneDrive — your local drives and any cloud-synced folders
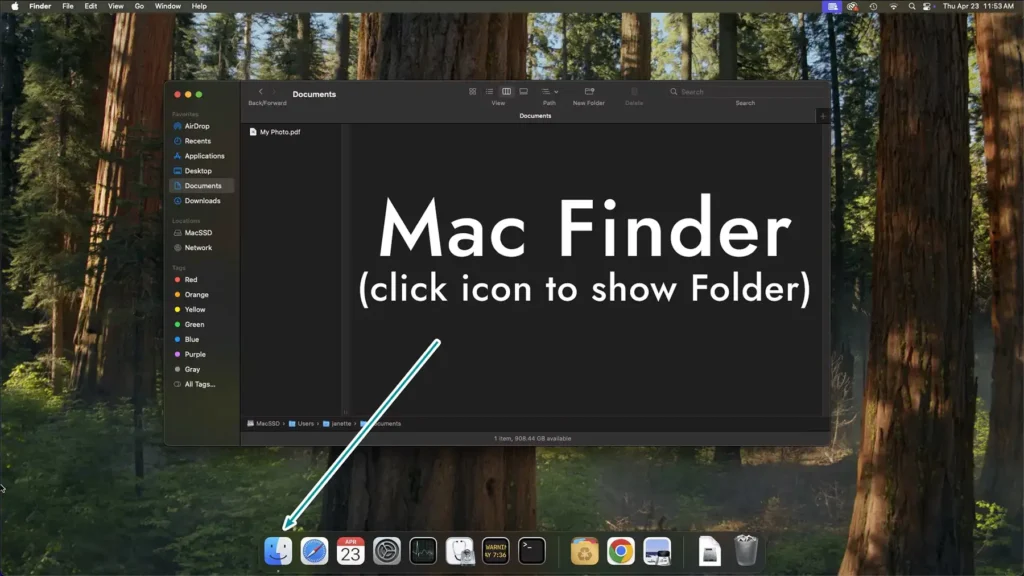
On Mac
Open Finder by clicking the icon in the dock. Similar to Windows, the left sidebar shows your locations: Desktop, Documents, Downloads, iCloud Drive, etc. A handy location called Recents will show files that have been recently added or modified, and is a great place to start.
At the bottom of a Finder window, you can enable the path bar (at the top left of your screen, select View > then Show Path Bar) to see exactly where you are.
The Most Common Problem: “I can’t find my file”
If you don’t see it in the usual folders above, like Documents, Pictures, or Recents, here are the places people forget to check:
- Your email’s attachments — did someone send you a file and you never actually saved it?
- Downloads folder — the single most cluttered, forgotten folder on any computer
- The program itself — many design programs have a “Recent Files” list under File > Open Recent
- Cloud storage — Dropbox, Google Drive, iCloud — the file might be synced online and not fully downloaded to your machine yet
If you truly can’t find the file, use your computer’s search:
- Windows: Click the search bar in File Explorer and type the filename or extension (like *.pdf or *.ai)
- Mac: Use Spotlight (Cmd + Space) and type the filename
Step 3: Understand File Types — and Which Ones We Can Actually Use
Not all files are created equal — especially when it comes to print. This is where a lot of confusion happens. A file can look fine on your screen and still be completely unusable for professional printing. (For a deeper dive on why that is, check out our posts on image resolution and vector vs. raster graphics.)
Here’s a breakdown of the most common file types and where they stand:
✅ Files We Love
PDF – Portable Document Format The gold standard for print submission. A PDF exported with “High Quality Print” settings locks in your fonts, colors, and resolution all in one tidy package. If your design program offers a PDF export, use it — and look for a “Print” or “Press Quality” preset. Our production workflows are PDF-based, so all other formats will be converted to PDF regardless of their original format.
AI – Adobe Illustrator The native file format for Adobe Illustrator. If you or your designer works in Illustrator, this is the original source file. It’s vector-based, meaning it scales to any size without losing quality.
INDD – Adobe InDesign The native file for Adobe InDesign, the industry standard for laying out multi-page documents like brochures, booklets, and newsletters. If you have this, great — just make sure to package the file with its fonts linked images, and export to PDF.
✅ Files That Will Probably Work
TIFF – Tagged Image File Format The preferred format for high-resolution photography going to print. TIFFs are large files because they don’t compress and throw away data the way JPGs do.
JPG / JPEG – Joint Photographic Experts Group JPGs can work for print if they were saved at 300 DPI or higher from an original source. A JPG downloaded from a website, texted to you, or exported from social media will almost certainly be too low-resolution. See our image resolution guide for details.
EPS – Encapsulated PostScript An older vector format, but still widely accepted. Often used for logos that need to be sent between different programs.
PNG – Portable Network Graphics Same story as JPG. PNGs are common for logos with transparent backgrounds, and they can be print-ready — but only if they were created at the right resolution from the start. A PNG screenshot is not a print-ready file.
⚠️ Proceed with Caution
Canva exports – Canva can produce print-ready PDFs – but only if you use the right export settings. In Canva, go to Share > Download > PDF Print. Check out our guide on exporting Canva art here.
⛔️ Files We Cannot Use
Screenshots A screenshot is a photo of your screen – it captures whatever your monitor is displaying at 72–96 DPI. Printing requires 300 DPI. A screenshot of your design, your email, your desktop, or a design program is not a file we can print.
Word Documents (.doc / .docx) Microsoft Word is a word processor, not a design program. Files created in Word are not suitable for professional print production. You can go to Save As, and Export to PDF, but the resulting PDF may be low resolution.
PowerPoint (.ppt / .pptx) Same issue. PowerPoint is built for presentations on a screen, not for print. If your design lives in a PowerPoint file, it will need to be exported to PDF, and still may not work well.
Images pulled from websites or social media Web images are compressed and low-resolution by design – they’re optimized to load fast, not to print sharp. Right-click-saving an image from Google, Facebook, or Instagram is not a print-ready file source. Not to mention, most images online are subject to copyright and illegal to print at a commercial printer.
Step 4: Send Us Your File the Right Way
Once you have the right file, you can email it, but even better is to use our Dropbox File Request page. Email compresses attachments and has lower file size limits. Instead, we use a simple Dropbox upload link with no account required, no login, and hopefully no drama.
Here’s how to upload your file:
- Go to our file upload page: 👉 Click here: https://tinyurl.com/cd-dropbox
- Enter your name and email address when prompted. This helps us match your file to your project.
- Click “Choose files” (or drag and drop your file directly onto the page).
- Navigate to where your file lives – remember Step 2? This is where that pays off. Find your PDF or other print-ready file and select it.
- Click “Upload” and wait for the confirmation message. That’s it! Your file lands directly in our hands.
A few tips:
- You do not need a Dropbox account to upload. The link works for anyone.
- Once uploaded, you’ll see a confirmation on screen. If you don’t see that confirmation, the file didn’t make it — try again or give us a call.
- After uploading, send us a quick email or call to let us know it’s on its way, especially if your project has a deadline.
Troubleshooting: “It Won’t Upload”
If you’re having trouble with the upload link, work through these steps one at a time before giving up:
1. Are you on your phone or tablet? Go back to Step 1. The Dropbox file request page works best on a desktop or laptop browser. Mobile uploads frequently fail or behave unexpectedly, especially with large files.
2. Try a different browser This is the fix that works most often. If you’re using Edge, try Chrome or Firefox. If you’re using Chrome, try Firefox. Some browser extensions and security settings interfere with uploads without showing any obvious error message. You can also try opening the link in an incognito or private window, which disables most extensions automatically.
3. Check your internet connection Large files need a stable connection. If you’re on Wi-Fi, make sure your signal is strong — or plug directly into your router with an ethernet cable if you can. Don’t try to upload over a hotspot or spotty coffee shop Wi-Fi.
4. Check the file size The upload link accepts files up to 2 GB. Print files are rarely that large, but if you’re sending a folder of files or a very high-resolution TIFF, check the file size before uploading. Right-click the file in File Explorer and choose Properties to see the size. (On Mac, right click and select Get Info.)
5. Clear your browser cache Sometimes old cached data causes upload pages to malfunction. Click here to find out how to clear any browser cache. Then reload the upload page and try again.
6. Make sure the file name doesn’t have special characters Dropbox can choke on file names that include symbols like # % & { } \ / : * ? < > |. Rename the file to something simple — like LastName_Logo.pdf — and try again.
7. Corporate or school network? Some workplaces and schools block Dropbox entirely at the network level. If you’re trying to upload from a work computer or on a company Wi-Fi network and nothing is working, try from a personal device on your home network instead.
Bonus: How to Attach a File to an Email
Sometimes you need to email us your file directly rather than using the Dropbox upload link. Here’s how to attach a file in the three most common email platforms, step by step.
One important note before you start: Most email providers cap attachments at 25 MB. Print files — especially TIFFs and high-res PDFs — can easily exceed that. If your file is large, use our Dropbox upload link instead. It handles files up to 2 GB with no fuss.
Microsoft Outlook
For the Windows desktop application:
- Open Outlook and click New Mail (or New Email) to start a new message.
- In the compose window, click the Attach File button in the ribbon along the top — it looks like a paperclip.
- A dropdown will appear with recently used files. If your file is listed, click it. If not, click Browse This PC at the bottom of the dropdown.
- Navigate to your file using the file browser window that opens. Find it, click it once to select it, and click Insert.
- You’ll see the file appear as an attachment below the subject line. Address your email, add a note, and hit Send.
Watch out for OneDrive: Outlook will ask if you want to send the file as a “link” (from OneDrive) or as a copy. The safest option is to choose Attach as a copy. If you choose to send as a link, make sure to change the permissions in that same dialog to “Anyone with the link” – otherwise we’ll get an Access Denied page when we try to open it.
Gmail
For Gmail’s webpage:
- Go to mail.google.com and click the Compose button in the upper left.
- A compose window will pop up in the lower right corner of your screen.
- At the bottom of the compose window, click the tiny paperclip icon (Attach files).
- A file browser window will open. Navigate to your file, click it to select it, and click Open.
- You’ll see the file appear at the bottom of the compose window while it uploads. Once it shows the filename without a progress bar, it’s ready.
- Fill in the recipient, subject, and message, then click Send.
Tip: You can also drag a file directly from File Explorer or Finder and drop it into the Gmail compose window — it will attach automatically.
If the file is over 25 MB: Gmail will automatically try to send it via Google Drive instead, and your recipient will get a link rather than a file. In the past, this works fine for us.
Yahoo Mail
For Yahoo’s wepage:
- Go to mail.yahoo.com and click the Compose button (it may appear as a pencil/compose icon depending on your view).
- In the compose window, look for the Attach Files icon in the toolbar at the bottom of the message area — it looks like a paperclip.
- Click it and select Attach files from computer from the dropdown.
- A file browser window opens. Navigate to your file, select it, and click Open.
- The file will appear below your message once uploaded.
- Address, write, and send your email as normal.
Heads up: Yahoo Mail can be picky. If the attach button doesn’t respond, try a different browser (Chrome works most reliably), or make sure the filename doesn’t include special characters like # & % *. Rename the file to something simple if needed — like Name_Logo.pdf — and try again.