

A guide to one of printing’s basic concepts.
You’ve designed your flyer. The colors are perfect, the layout is chef’s kiss, and you’re ready to hit print. Then your printer asks: “Where is the bleed?” You stare blankly. Is that a design term? A medical condition? A trap?
Don’t worry – bleed is one of those print concepts that sounds alarming, but is actually very simple once you see it. And once you understand it, you’ll never send a print-ready file without it again.
The problem with cutting
When a commercial printer produces hundreds (or thousands) of copies, they don’t print one page at a time. They gang multiple designs onto large sheets and then cut them down to size using a guillotine or cutting die.
Here’s the catch: cuts are never 100% perfect. A sheet can shift by a fraction of an inch during the cut. That’s imperceptible under a ruler – but very visible when a background color suddenly stops short of the edge, leaving a sliver of white paper peeking through.
That little white sliver is the problem that a bleed is designed to prevent.
So what exactly is a bleed?
A bleed is an extension of the artwork that extends beyond the intended final size of your document. Any design element – a background colour, a photo, a pattern – that you want to run right to the edge needs to extend into this bleed area.
When the printer cuts, they cut through the bleed. The bleed gets thrown away. What’s left is a perfectly edge-to-edge design with no white margins in sight.
The three zones to know
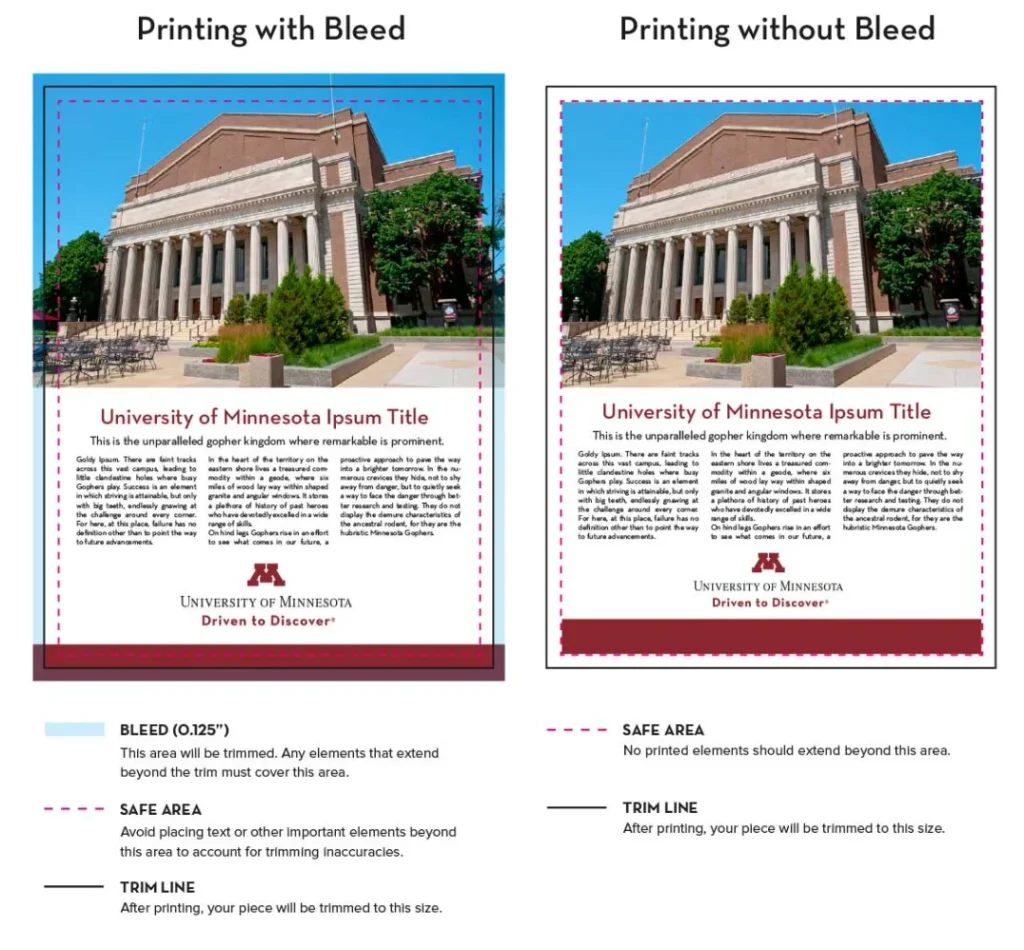
- Bleed area: typically 0.125″ beyond your trim edge. Your background and edge-to-edge images must extend here. This zone gets cut away.
- Trim line: the actual final size of your finished piece. This is where the cut is intended to land.
- Safe zone: 0.125-0.25″ inside the trim line. Keep all important content (logos, text, faces) inside here. Even if the cut drifts slightly, nothing critical gets chopped off.
Quick rule of thumb: extend background art 0.125″ out, keep important content 0.125″ in. Everything in between is the printer’s wiggle room.
Do I always need it?
Only if your design has anything going right to the edge, called a “full bleed” design. If your artwork has a white background and nothing touches the sides, you’re fine without it. But the moment a color or image hits the edge of your artboard, bleed is essential.
All professional design tools (Adobe InDesign, Illustrator, even Canva) let you set bleed when you create your document. Set it from the start, since retrofitting it later can be a headache.
Further reading: Add crop marks and bleed in Adobe or Add crop marks and bleed in Canva
A quick recap
Bleed is extra artwork beyond the edge, so cuts can drift without ruining your design. It gets trimmed off and never appears on the finished piece. It is, however, the difference between a professional result and a print job that makes you wince.
Now you know. Go forth and bleed – responsibly.