

When preparing files for professional printing, creating a print-ready PDF is essential. While Adobe Illustrator (.ai), Photoshop (.psd), and InDesign (.indd) files are powerful for design work, they come with significant challenges when sending to printers.
Why PDFs Are Ideal for Print
The Problem with Native Files:
- Missing Fonts: Photoshop, Illustrator, and InDesign files rely on fonts installed on your system. When you send a .psd file to a printer, they may not have the same fonts, resulting in substitutions that alter your design.
- Broken Links: Illustrator and InDesign files often reference external image files. If these linked files aren’t packaged correctly or are missing, your artwork won’t display properly at the print shop.
- Editable Elements: Native files contain editable layers, effects, and properties that can shift or render differently on another computer, especially if fonts or linked assets are missing.
The PDF Solution:
A properly exported print-ready PDF embeds all fonts, flattens transparent elements, includes all linked images, and maintains consistent appearance across all systems. It’s a self-contained file that looks identical whether opened on a Mac, PC, or by the printing press’s RIP (Raster Image Processor).
Quick Navigation
Creating Print-Ready PDFs from Adobe Illustrator
Follow these steps to export a professional print-ready PDF from Illustrator:
- Complete Your Design
- Ensure all artwork is finalized and all elements are properly placed within your artboard
- Check that your document includes appropriate bleed (typically 0.125″ or 3mm)
- Access Save Options
- Go to File > Save As (or File > Save a Copy if you want to keep your .ai file open)
- Choose Adobe PDF (pdf) from the Format dropdown menu
- Name your file and select the save location
- Click Save
- Select PDF Preset
- In the Save Adobe PDF dialog box, choose [Press Quality] from the Adobe PDF Preset dropdown
- You may also use [PDF/X-4:2008] but this does not preserve Illustrator’s editing capabilities. These presets are optimized for professional printing. Both of these presets will set the remaining settings, except for the bleeds in Step 5.
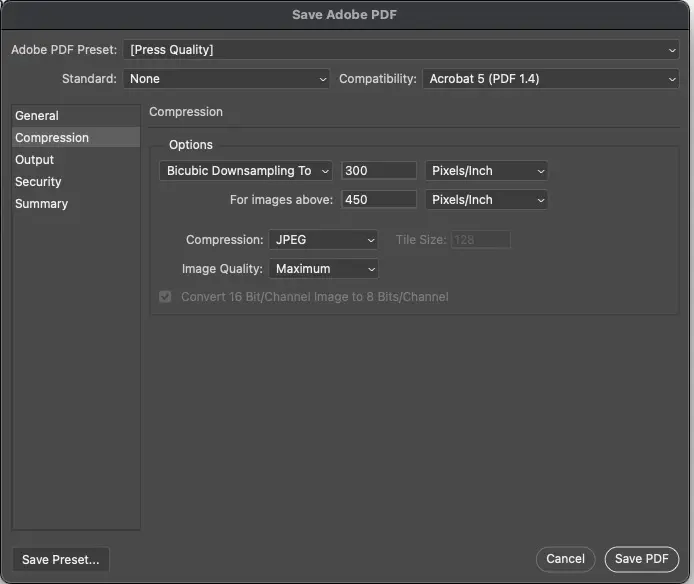
- Configure Compression Settings
- Click Compression in the left menu
- Set all images to “Bicubic Downsampling”
- Ensure resolution is set to at least 300 ppi for color and grayscale images
- Set Compression to Automatic, JPG or ZIP (lossless), leaving Image Quality at Maximum
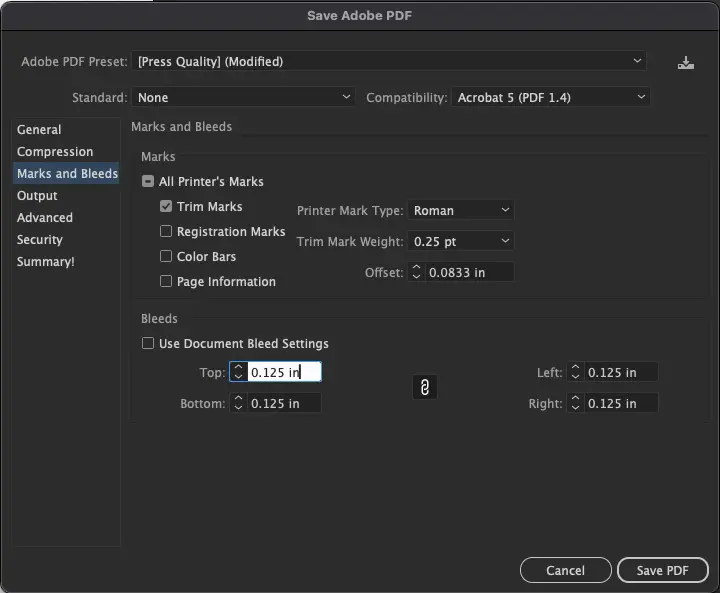
- Set Marks and Bleeds
- Click Marks and Bleeds in the left menu
- Check Trim Marks
- Uncheck Use Document Bleed Settings unless you are sure your document’s bleed settings are correct
- Set bleed to 0.125″ or 3mm all the way around – top, bottom, left and right.
- Review and Save
- Check the Summary panel for any warnings or errors
- Click Save PDF
- Verify the exported file opens correctly in Adobe Acrobat
Official Adobe Support: How to create Adobe PDF files in Illustrator
Creating Print-Ready PDFs from Adobe Photoshop
Photoshop requires special attention since it’s primarily a raster-based editor. It does not account for the bleed like InDesign and Illustrator do. Follow these steps:
- Set Up Your Document Correctly
- Before starting, ensure your document is created at the final size PLUS bleed (add 0.25″ total – 0.125″ on each side). For example, a letter size of 8.5″x11″ should be 8.75″ x 11.25 with bleed.
- Go to Image > Canvas Size to add a bleed if needed.
- Keep all text at least 0.25″ from the edge of the document.
- Go to Image > Image Size
- Verify Resolution is set to 300 pixels/inch minimum (higher for large-format prints)
- Prepare Your File
- Save your layered working file first (as .psd) for future edits
- Delete any guides, templates, or non-printing elements
- Flatten your image: Layer > Flatten Image (unless you need to preserve vector text)
- Begin PDF Export
- Go to File > Save As (or press Shift + Ctrl + S on Windows / Shift + Command + S on Mac)
- Choose Photoshop PDF from the Format dropdown
- Name your file and select save location
- Click Save
- Choose PDF Preset
- In the Save Adobe PDF dialog box, select [Press Quality] or [PDF/X-4:2008] from the Adobe PDF Preset dropdown
- General Settings
- Under the General tab:
- Set Compatibility to Acrobat 5 (PDF 1.4) or higher
- Check Preserve Photoshop Editing Capabilities
- Compression Settings
- Click Compression in the left menu
- Set all images to “Bicubic Downsampling”
- Ensure resolution is set to at least 300 ppi for color and grayscale images
- Set Compression to JPG or ZIP (lossless), leaving Image Quality at Maximum
- Save Your PDF
Official Adobe Support: Save as Photoshop PDF
Creating Print-Ready PDFs from Adobe InDesign
InDesign is specifically designed for print layout and offers the most robust PDF export options:
- Preflight Your Document
- Before exporting, go to Window > Output > Preflight
- Check for missing fonts, low-resolution images, and broken links
- Resolve any errors before proceeding
- Verify Bleed in the Document Setup
- Go to File > Document Setup
- Expand (>) the Bleed and Slug section, ensure your document includes proper bleeds (typically 0.125″ or 3mm on all sides)
- Check that all images are high-resolution (300 dpi minimum)
- Confirm all fonts are activated and available
- Begin Export
- Go to File > Export
- Choose Adobe PDF (Print) from the Format dropdown
- Click Save
- Select PDF Preset
- In the Export Adobe PDF dialog, choose [Press Quality] or [PDF/X-1a:2001] from the Adobe PDF Preset dropdown
- PDF/X standards ensure compliance with professional printing requirements. Both of these presets will set the remaining settings, except for the bleeds in Step 7.
- General Settings
- Under the General tab:
- Ensure Pages is set to All (or specify your range)
- Leave Pages selected (not Spreads, unless specifically requested)
- Set Compatibility to Acrobat 5 (PDF 1.4) or higher
- Compression Settings
- Click Compression in the left menu
- Set all images to “Bicubic Downsampling”
- Ensure resolution is set to at least 300 ppi for color and grayscale images
- Set Compression to Automatic, JPG or ZIP (lossless), leaving Image Quality at Maximum
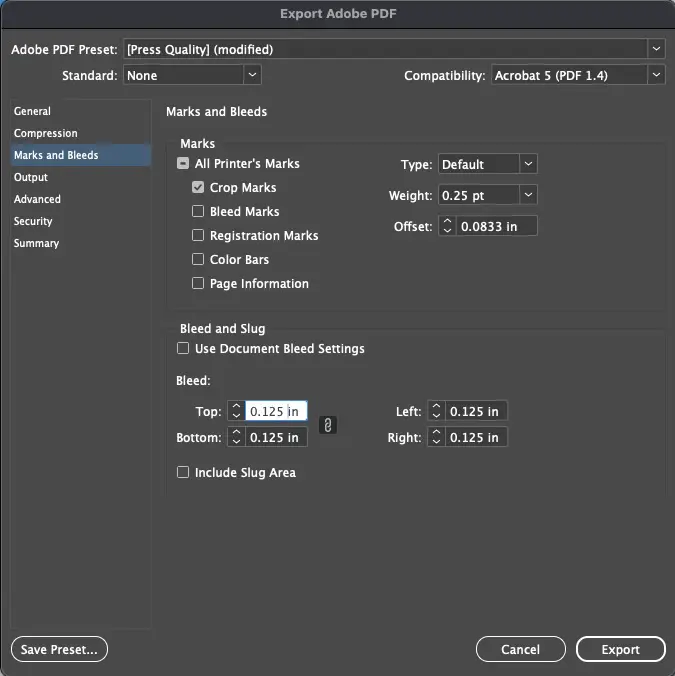
- Marks and Bleeds
- Click Marks and Bleeds in the left menu
- Check Crop Marks
- Uncheck Use Document Bleed Settings unless you are sure your document’s bleed settings are correct from Step 2 above.
- Set bleed to 0.125″ or 3mm all the way around – top, bottom, left and right.
- Review and Export
- Click the Summary tab to review all settings
- Check for any warnings or errors
- Click Export
- Open the PDF in Adobe Acrobat to verify the file
Official Adobe Support: Export InDesign files to Adobe PDF
Key Takeaways for All Programs
Regardless of which Adobe program you’re using, remember these critical points:
✓ Resolution: Always ensure images are at least 300 dpi for print quality
✓ PDF Export Preset: Generally the [Press Quality] preset will automatically set most of what you need – everything except the bleed.
✓ Bleeds: Include 0.125″ (3mm) bleed on all sides where you have artwork or a background that extend to the edge
By following these detailed steps for each program, you’ll create professional print-ready PDFs that will reproduce exactly as you intended, without font substitutions, missing links, or resolution issues.